Monday, November 24, 2014

F.E.A.S.T.: Clam Chowder

Wait a minute, didn't I just post something yesterday? I seem to recall doing something with lots of pumpkin....

Eh, what're you gonna do?

Hello again, dear readers!

In honor of the recent snap of cold weather we had a short time back (when everything decided to get down below freezing before jumping back up to the 70s), I decided that it was the perfect time to try my hand at making some soup. OK, so my roommate requested it, but who's keeping track?

So I made it my mission to make New England style (or close enough) clam chowder, from scratch, as a F.E.A.S.T.! I got everything together, I worked my tail off, and I made a pretty delicious bowl of soup, thank you very much. Then I looked at my budget. And then I looked at the clock.

::sigh::

Yeah. So, not a F.E.A.S.T., or at least, not really. I went over on both time and funds, which are two of the four pillars that hold up this whole wacky concept. So to say that this one is teetering would be an understatement. However! The soup was a success, and I think that with a bit of stretching, we can make this work, even if we have to bend the rules a bit. Regardless, I think this one is worth sharing, so I'm going to do just that!

WHAT I USED!!!
2 small yellow onions, diced ($1.0)
10-12 yellow potatoes, cubed (from a $1.5 bag)
4 cans baby clams, water reserved ($8.0)
32oz veggie stock ($2.0)
1pint heavy cream ($2.0)
1/2 package of bacon!, diced (from a $3.5 package)
a few sprigs of fresh thyme ($2.0)
3-5tbs AP flour (stock)
a few bay leaves (stock)

Final Price: $20

Huh, OK, so now that I've written it out, maybe I didn't go as over on the budget as I'd thought. I must be remembering something else. And it does make a lot of chowder, so I don't feel too bad about being on the borderline.

WHAT I DID!!!
In a large stockpot, cook the bacon over medium heat until almost crispy, then toss in the onions. Throw a bit of salt on top of them for good measure. Give the onions about 5-7min to soften. When the onions are cooked, but before they start to take on too much color, sprinkle on your flour. You want enough to absorb all the bacon drippings and form a roux. This will help to thicken the soup. It's hard to describe, but suffice to say, when it looks like a thin paste with no flour lumps, you should be set.

Once you have your roux, add the veggie stock and stir to combine with all the flour. Once it's smooth, add the water from the clams, the cream, and the potatoes. You can toss the bay leaves (which will have to come out at the end) and the thyme in as well, or you can put them in a large tea ball and let them steep that way. Bring the mixture just to a boil, then lower the heat and simmer for about 15-20min., or until the potatoes are fork-tender.

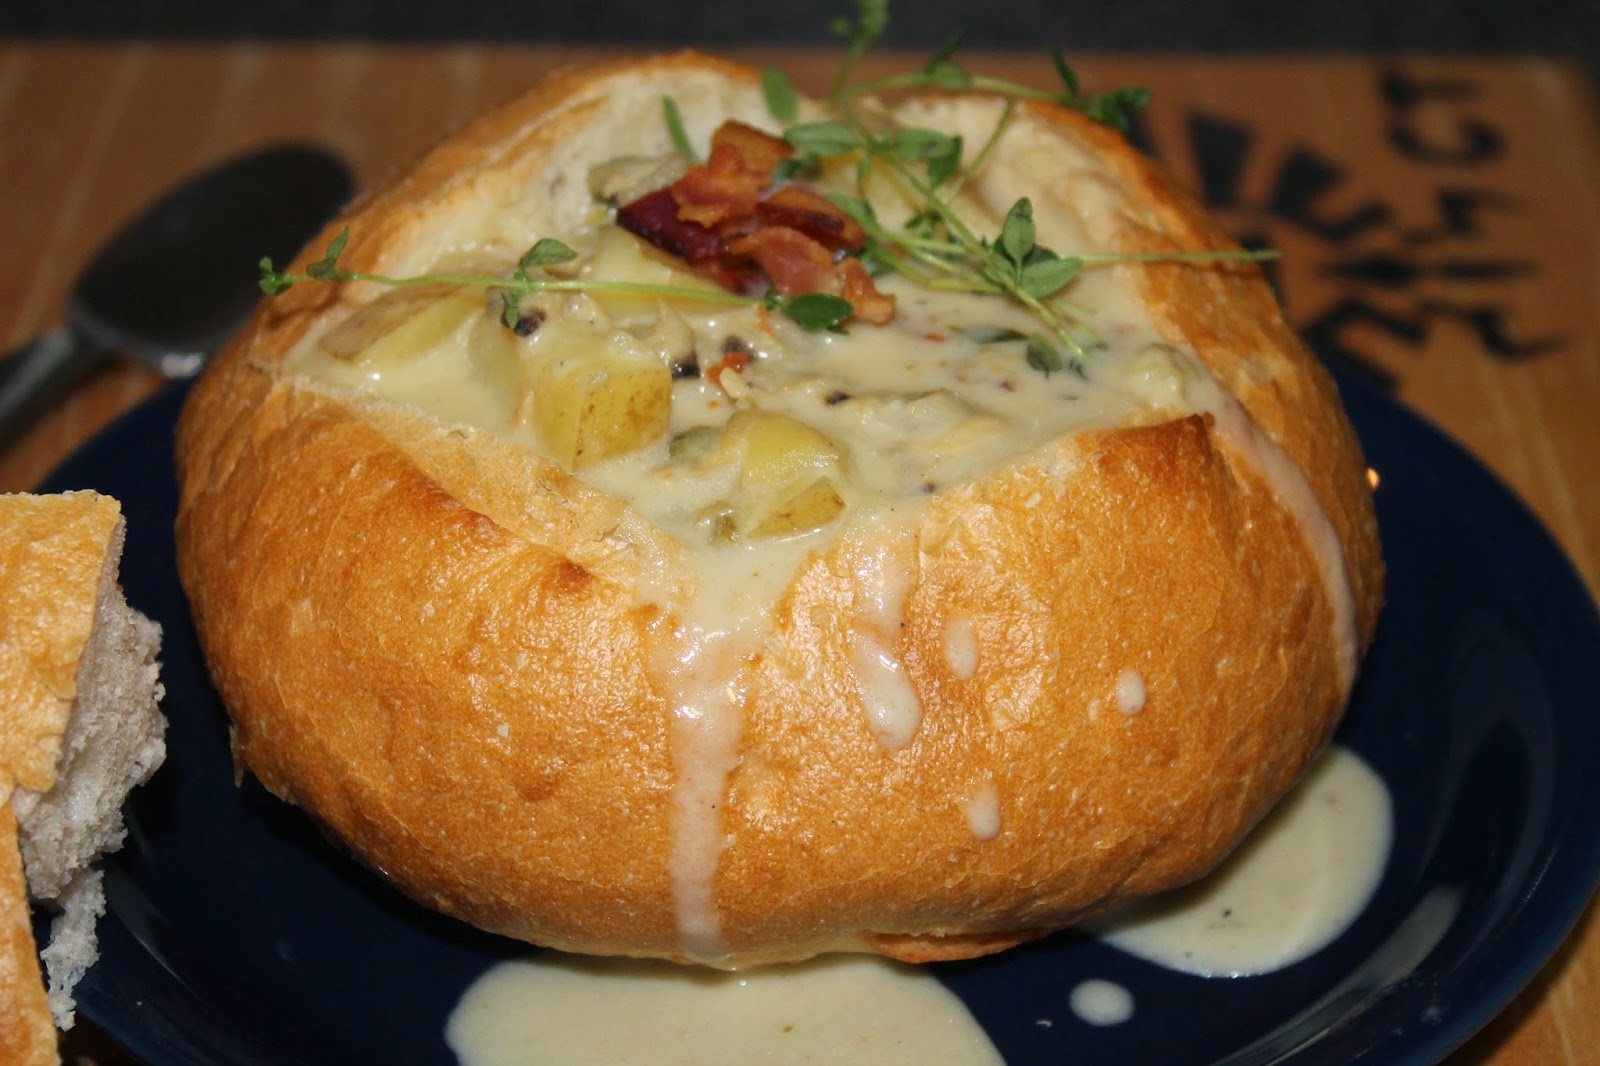
Toss the clams in, and sprinkle a healthy amount of freshly-ground black pepper over the whole thing. Give it another five minutes for the clams to firm up, and you're ready to serve with (or in!) the bread of your choice!


Alright then, let's get right to our acronym. I, for one, am anxious to see how this all pans out!

Fast: Not really. The whole thing, starting with chopping the veggies, took about an hour and twenty minutes. So no luck there. But what am I saying? Get some help and make it go faster! (Just be careful out there with all the sharp knives, OK?)

Easy: Yeah, it's basically adding a bunch of stuff to a pot and letting it go. That's why I love soup; it really is just that easy!

Affordable: Twenty bucks for about 8 servings seems pretty awesome to me. Woo-hoo! We made this pillar work after all!

Super Tasty: Oh very yes. The clams, so plump and juicy, with just a hint of the sea, were definitely the main attraction. But the seasonings and the potatoes added their own unique flavors as well, providing a perfect balance. It was creamy and hardy without being too thick, like canned chowders so often are. I call it good ol' fashioned comfort food, the kind that fills you up and warms you through. And the bacon, of course, makes everything better.

So there you have it: a savory bowl of clam chowder, prepped in just over an hour with a conscious nod towards a healthy budget. I hope you enjoyed this entry, and I hope that you will give this soup a try and tell me what you think. I more or less crafted it myself, taking elements and inspiration from about three or five different methods I found around the internets, so I am very interested to hear what people think.


(Oh, and this shouldn't be an issue, but we did find a wee piece of clam shell in with the meat, which was very unpleasant to bit down upon, I am sure. Just be careful, kids.)

Until next time, go forth and eat well!

Sunday, November 23, 2014

Happy Holidays! Pumpkin Three Ways

Hello everyone!

With Thanksgiving nearly upon us, I thought it would be appropriate to present a selection of pumpkin-themed offerings for your perusal. Yes, if you remember my last post, you'll be thinking to yourself, "Didn't he just do something with pumpkin? What is with this guy? Is he just crazy, or is he obsessed with pumpkin-flavored treats?"

Yes. Yes, I am.

Okay, so I'm not really obsessed with pumpkin, and I prefer to think of myself as delightfully quirky rather than flat-out nuts.  So there's that, I suppose. But I did think that since it is the one time of year when everyone actually cares about the bright orange gourd, I should make the most of it.

So today, I'm offering you pumpkin three ways: first, as a savory cornbread, second, as a sweet mousse, and finally, third, I'll offer a quick review of a pumpkin ale I discovered. It may seem like a lot, but trust me, these will all go by fairly quick.

First, the pumpkin cornbread!

WHAT I USED!!!
1 cup cornmeal
1 cup AP flour
2 tsp baking powder
1/2 tsp baking soda
a heavy pinch kosher salt
1/2 tsp cinnamon
1 cup pumpkin puree
3/4 cup buttermilk
2 eggs, lightly beaten
1/4 cup vegetable oil
3 tbs sugar
3 tbs honey

WHAT I DID!!!
Whisk the cornmeal through the cinnamon (the dry goods) together in a large mixing bowl. Next, mix the rest of the ingredients (the wet goods, and yes, sugar counts as a wet ingredient) together in a second mixing bowl using your hand mixer or a large spoon. When both the dry and the wet ingredients have been thoroughly mixed, pour the wet on top of the dry. Stir until everything just comes together; do not over-mix.

Spray a muffin tin with non-stick cooking spray. Divide the batter evenly between the twelve cups. Bake at 400 degrees for 30 to 35 minutes, or until the tops have browned slightly and a toothpick poked into the center of a muffin comes out clean. Consume!

There you have it, quick and painless. The pumpkin flavor, while noticeable, is subtle. The cornbread definitely tastes like cornbread, rich and light and sweet. I believe it would be a great thing to serve at Thanksgiving dinner, or with any meal that you want to have a bit of a Fall kick.

Next, the dessert: pumpkin mousse!

WHAT I USED!!!
1 block cream cheese, softened
1 small package instant vanilla pudding
1 cup pumpkin puree
1 cup whipping cream (I actually used two, but it was too much)
1 tsp cinnamon
1/2 tsp each other spices of your choice (nutmeg, clove, ginger, etc.)
1 tsp vanilla extract

WHAT I DID!!!
In a chilled metal bowl, thoroughly beat the whipping cream until stiff peaks form. Remember, stiff peaks are the ones that form on a beater, pulled from the food and inverted, in the shape of little towers that don't collapse when the implement is gently tapped. You follow me here? Anyway, beat it until it looks like whipped cream and you're golden. Use your stand mixer with the whip attachment if you've got it.

Stir the other ingredients together until you get a homogenous mixture. I used my hand mixer for this part. When this is done, stir about a third of the whipped cream into the pumpkin mixture, just to lighten it up. Then, using a spatula, fold in the remaining whipped cream. Do this with cutting-and-flipping motions, rather than with stirring ones. Refrigerate until chilled, then serve with ginger snap cookies!

Once again, quick and painless. The flavors and the texture are both very light and very smooth. I admit, I used two cups (read: too much) of whipped cream, but I can extrapolate what the results would have been, so no worries, right? Either way, it was tasty without being too sweet, and I think it could give the traditional pumpkin pie a run for its money at your next holiday party!

Finally, our review. I present to you the New Belgium brand Pumpkick Ale.

Now, I'm no aficionado, but I do know what I like, and I thoroughly enjoyed this ale. It has all the traditional spiciness you'd expect in a pumpkin ale: cinnamon, nutmeg, allspice, etc. And, unlike some "pumpkin" beers I've had in the past, you can actually taste the pumpkin along with those spices.

But, they upped the ante on the Autumn flavors. In a stroke of inspiration, they spiked the whole thing with a splash of cranberry juice. Not only did this add notes of subtle sweetness, but it also gives the beer a bit of tartness to help counteract the heavy flavors from the spices. I know, it sounds kind of crazy, but trust me when I say it definitely works. If you can find it, give it a try, see what you think. I certainly wasn't disappointed.


Well, there you have it folks. Pumpkin in three forms, all of them delicious. I have to say, I love this time of year, with all the food and celebrations and whatnot. But I think we should also take a moment and be thankful that we are able to have this much fun with our food. Just a thought, and one I'm sure you'll share.

Anyway, thanks as always for reading! I look forward to reading any comments or suggestions that you may have.

Until next time, go forth and eat well!

Saturday, November 8, 2014

Happy Holidays! Pumpkin Juice

Hello faithful readers! And Happy (belated) Halloween!

If you remember my post from last year, you'll remember that I love Halloween. I love the pageantry, the fun, the spine-tingling terror, everything. Well, I made my famous Broken-Glass Cupcakes again this year, but I wanted to do something in addition to all of that. So I wracked my brain and came up with something that I've always wanted to try: pumpkin juice!

Now, if you're a fan of the Harry Potter book series, then this concept needs no introduction. If for some reason you haven't read this series, (and let's be honest: why are you reading a blog with a DnD joke in the title if you haven't?) then you should know that it is quite prevalent in that world.

Now, to be fair, I didn't set off with the idea of, "Hey! I'll make Harry Potter pumpkin juice!" The idea was wholly my own, what with this being the time of year for pumpkin-flavored everything. But I can't deny I wouldn't have had the idea in the first place were it not for the books. So let's just say it was a joint effort and leave it at that, shall we?

Ok, to business. The idea is fairly straight-forward, and I have presented it two ways, so you can choose the method of your liking. I actually tested this recipe a few times, and I think I've gotten it right. But I'll let you be the judge of that. I think you'll be pleasantly surprised!

WHAT I USED!!!
6 cups good quality apple cider, chilled (divided, if you follow the Long Version)
1 cup canned pumpkin puree
1/4 cup apricot preserves
1/4 cup salted caramel syrup (room temp, unless you follow the Long Version)
2 tsp ground cinnamon
1/2 tsp ground clove
1/2 tsp ground ginger
1/2 tsp ground allspice
1/2 tsp ground nutmeg
Silver rum, to taste (optional)

WHAT I DID!!!
The Short Version:
Take all the ingredients (except the rum, if using) and combine in a pitcher or punch bowl. Combine using a whisk or immersion blender, then pour off into glasses. Add rum if desired. Consume!

The Long Version:
Take 2 cups of your cider and pour it into a small pot or sauce pan and place over medium-low heat. Add the preserves, caramel, and spice, and heat until the mixture just reaches a simmer, whisking occasionally to blend. Lower the heat slightly, and simmer for about 10 minutes.

In the serving vessel of your choice, combine the remaining four cups of cider and the pumpkin, and combine using a whisk or immersion blender. When the stove-top cider has finished, pour the mixture into the serving vessel. Blend well, then chill. Do not pour over ice! If you need to chill the drink quickly, pour into a shaker with ice and do it up cocktail style. Add the rum at this time if using. Consume!


See? It's super easy and super tasty! The cider provides a good strong base, and the preserves and caramel provide a smoothness and a sweetness that is wonderful. The pumpkin flavor itself is subtle, but definitely prevalent, and the spices provide a warmth to the drink that is infinitely satisfying. The Long Version takes a bit more time, but the flavors are more intense too, so it's worth it.

Anyway, that's all for now. I hope you enjoyed reading about this beverage as much as I enjoyed creating it. As always, comments and suggestions are welcome and encouraged.

Until next time, go forth and eat (and drink!) well!

Saturday, October 4, 2014

F.E.A.S.T.: Shrimp Risotto

Yeah, you read that right: Shrimp. Risotto. As a F.E.A.S.T.

Where did this come from, you ask? Surprisingly, nowhere in particular. I like shrimp. I like risotto, and I hadn't made any in some time. And while I was planning my meals for the week, I remembered that I needed to blog about something. So I asked myself, what do I do? And then the idea just came to me: what if I could do risotto as a F.E.A.S.T.?

"Madness!" I hear you say. "You can't do risotto on the cheap! You can't do it in under an hour!"

Oh, but you can!

::cue maniacal laughter::

OK, so it really isn't all that crazy truth to tell. And I didn't quite hit all the points needed for it to qualify as a F.E.A.S.T., but I'll explain that in a minute.

The truth is that shrimp, like most seafood, is actually quite easy to cook. You just have to have quality ingredients and you need to not over-complicate things. And trust me, I am the master of over-complicating things that don't need to be over-complicated. Luckily, seafood is not really one of them. The same goes for risotto. In reality, it isn't all that tricky; you just have to be diligent. That means that unlike with regular rice, you can't just walk away from it. It needs tending.

So, if you treat the ingredients right and just pay attention to what you're about, you can come up with something that's truly delicious. And everyone you serve will be so impressed that you made freaking shrimp risotto of all things, that you come off looking like a master chef. It really is just that impressive!

Oh, but still you doubt me? Well, read on dear readers, and judge for yourselves!

WHAT I USED!!!
1 yellow onion, diced  ($1.0)
a few tsp garlic, divided  (stock)
2 cups Arborio rice  (from a $6.0 container)
Approx. 5 cups vegetable broth or stock  ($3.0)
1 1/4 cup dry white wine (like chardonnay), divided  ($5.0)
6 tbs (unsalted) butter, divided  (stock)
1 lb frozen medium shrimp (raw, de-veined, tail-on), thawed  ($6.5)
Basil, julienned  ($2.0)
Juice of 1 large lemon  ($1.0)
Parmesan cheese, to taste  ($2.5)
Salt and pepper  (stock)

Final price for ingredients: $27.0

OK, so I'm over on my budget here, I admit that. But I only used about half the rice, and we were able to drink the rest of the bottle of wine with the meal. So technically I only went over by a little bit.

That's my story and I'm sticking to it.

WHAT I DID!!!
Bring the broth to a simmer over medium heat. Once you reach that point, drop the heat and keep the broth hot.

Meanwhile, melt 4tbs butter in a large saucepan over medium heat. Toss in your onion and some garlic, and cook for around 5 minutes, until the onion begins to turn translucent. Season with your salt and pepper, and don't be skimpy.

Add your rice to the pan and stir/toss the grains to coat them in the butter and onion mixture. Toast the rice, stirring regularly, for a few minutes, taking care not to let the rice burn.

Add 1 cup of white wine and stir occasionally until the rice has absorbed all the liquid. Then, add your hot broth a ladle-full or two at a time, and stir until that liquid has also had a chance to absorb.

Once you've gotten through about half to two-thirds of your broth, melt the remaining 2tbs butter in a large skillet set over medium heat. Add the rest of your garlic, the shrimp, half of the lemon juice, and the remaining 1/4cup of wine to the skillet, and season with salt and pepper. Saute until the shrimp turns opaque all the way through.

Taste the rice after each broth addition when you get near the end. The grains should be firm but not crunchy, and soft but not gummy. If you have to, ease up and don't add the last cup or so of the broth, but I found that this wasn't necessary.

Add the remaining lemon juice to the rice, then pour in all of the liquid from the shrimp. Stir in the shredded basil and the Parmesan.

Scoop the rice into a bowl, top with a few shrimp and some more Parmesan, and enjoy!


There now, that's not so difficult, right? Let's review our acronym.

Fast: Yep, right on the nose. From prep to eat took exactly one hour, and that was with me sort of making things up as I went. I had a couple methods to use as guides, true, but I really did just do this one on my own accord. The point is that I said it would take an hour, and it did!

Easy: I would say so. Sure, it's not as easy as making a sandwich, but it ain't rocket science either. Just keep your eyes on the rice and don't let it burn or get soggy, and you'll be fine. The trick is to just keep stirring the pot, and I know that you can handle that part.

Affordable: Like I said, I did go over my $20 budget, which is unfortunate. But I have enough rice left over to make a second meal, so I feel like I only went over by a few dollars. But, a budget is a budget, and I did bust it on this one. Still, the results were worth the extra expense, in my opinion.

Super Tasty: Yes. Very yes. The shrimp were succulent and juicy, with a light, aromatic flavor. The rice was wonderfully creamy, cooked to a perfect al dente. Together, with the acidity of the lemon and the pepperiness of the basil, they came together to make a wonderfully light, and surprisingly healthy, meal that was very satisfying nonetheless.

So there you have it: shrimp risotto in an hour for around twenty bucks. It's easy, it's delicious, it's a F.E.A.S.T.!

As always, thanks for reading. I hope that you enjoyed it. Comments and suggestions for new meals are always welcome. Until next time, go forth and eat well!

Sunday, September 28, 2014

Cocoa Peanut Butter Banana Bread

Hello once again!

As I'm sure you've already guessed from the nature of this blog, I like to experiment with my food. Sometimes it works and I discover something tasty, and sometimes it doesn't and explodes like so much... exploding... explody stuff. My poor attempt at an analogy aside, I am pleased to say that this time my experimentation not only worked, but worked rather well.

It started a few weeks ago, when I had some bananas lying around that were too ripe to eat out of hand. Obviously, the solution was banana bread, but I didn't have a banana bread recipe I liked. Sure, I had the one I created years ago that used coconut and walnuts, but that one tended to lean towards the explody end of the spectrum. Plus, I was out of walnuts anyway, so no dice. So I went digging around the internets, trying to find a new method. While I found plenty of recipes, I didn't find one that spoke to me. I was about to say, "To hell with this!" and start flipping over metaphorical tables when I had another crazy idea: why not just make something up?

Why was this idea crazy? Because banana bread is baking, and baking is as much a science as an art, and you can mess things up if you don't get the ratios right. But then again, science is about experimenting with the unknown, and trying new things, and laughing maniacally as you're throwing random ingredients together into a mixing bowl. Or maybe that last one is just me?

Regardless, this idea came together as a way to make a new banana bread that I had never tried before, and I am pleased to say it turned out quite well. I was about to try it simple as a cocoa banana bread, and I think it would have been good that way too. But then the idea sprang up to add peanut butter chips, and it took everything to a whole new level. Try it yourself if you don't believe me.

So, without further ado, let's get started.

For Science!

WHAT I USED!!!
2 cups AP flour
1 cup cocoa powder
1 1/2 tsp baking powder
1/2 tsp baking soda
a good pinch or two of kosher salt
5 very ripe bananas
1 cup brown sugar
1/2 cup white sugar
3 eggs, beaten
1 stick of butter, melted
2/3 cup sour cream
a good splash of vanilla
1 cup chocolate chips
1 cup peanut butter chips

WHAT I DID!!!
Combine the flour, cocoa, baking powder, baking soda, and salt together in a large mixing bowl. If you feel like sifting, go ahead and do it to break up any clumps and ensure that everything is evenly distributed.

In another bowl, peel and mash your bananas until smooth. Using a hand mixer, work in the sugars, followed by the eggs, butter, sour cream, and vanilla.

Pour the wet stuff over the dry stuff, and fold everything together with a great honking wooden spoon or spatula. Then stir in your chips.

(This is called the Muffin Method, by the way, and is used for everything from muffins to waffles. You don't want to over-mix, or the flour will produce too much gluten and then everything will be tough. We don't have to worry about that too much here, but still, mix everything until it is just combined. Don't fret if it's a bit lumpy; the lumps will cook out.)

Divide the batter evenly between two standard size loaf pans, and bake at 350 for 50-55 minutes, or until a toothpick inserted into the middle of the load comes out clean.

And that's all folks! It's quick, it's easy, it's delicious.


You get a definite chocolatey flavor throughout the bread, with little pops of sweet and salty peanut butter now and then. But the predominant flavor across the board is definitely the banana, which is good, since that's kind of the point after all. Over all, you get a moist and tasty quick bread with a lot of flavor and a lot of surprise from those eating it.

This experiment, if I do say so myself, is a definite success.

Well, thanks for reading as always. Comments and suggestions are always welcome.

Until next time, go forth and eat well!

Tuesday, September 16, 2014

Scallops with mashed potatoes and asparagus

Hello again, dear readers!

Today, I just wanted to share a tasty dish I made for dinner last week: scallops. Nothing fancy, nothing crazy, not even a F.E.A.S.T., just a simple meal that you yourself can make without too much effort.

"Ye gods!" you say. "But wherein lies the adventure?" you ask. An excellent question, indeed! And I have an answer for you!

::cue crickets chirping::

Ok, so there really isn't one. I've made scallops before, and they're easy. I mean, super easy. But I haven't had the chance to prepare them in ages, so I wanted to try my hand again. I looked up several methods and then adapted my favorites into a cohesive whole. And I am pleased to say that they turned out marvelously. And that's why I decided to tell you about them: because they're easy enough to cook that with a little effort you too can plate a mighty impressive dish that will have others saying, "ooh" and "ahh."

Don't believe me? Come now, have I ever led you astray? And no, don't even talk about my last experiment with ice cream; that was for science!

WHAT I USED!!!
1lb. frozen bay scallops, thawed, drained, and patted dry
3 slices bacon, chopped
2/3 cup apple juice or cider
1 half-pint heavy cream
approx 2lbs golden potatoes
1 stick butter, softened
1 bunch of asparagus
garlic, minced, to taste
salt and pepper
fresh chives, chopped

WHAT I DID!!!
Drop the potatoes in a pot and add enough water to cover by an inch. Give it a good pinch of salt and then set it over high heat. Once it boils, drop the heat to med-low and let them simmer for about 20-30 minutes or until the taters can be easily pierced by a knife without much resistance. Drain the spuds once they're done.

Meanwhile, prepare your asparagus. Hold the stalks one at a time by the base and near the middle, and start bending them gently. The hard, undesirable part of the stalk should snap cleanly off. Bring a pot of water to a boil. Once this is ready, drop the asparagus in and give it a minute to blanch. This will improve both the color and the flavor. After a minute, transfer the veggies using a slotted spoon into a waiting bowl of ice water to halt the cooking process. Once they've cooled, set them aside to dry.

Cook the bacon in a large nonstick skillet over medium heat until browned. Using your trusty slotted spoon once more, transfer the bacon to a waiting pile of paper towels to drain. Up the heat to high and add the scallops to the bacon drippings! to cook. Give 'em a few shakes and cook until they all just turn opaque, or about four minutes. Grab that ever-so-useful slotted spoon once more and remove the scallops to a dish, and stash said dish in a warm oven to keep things toasty.

Add the apple juice/cider and 1/3 cup of the cream to the pan. Cook this mixture to boiling over med-high heat until the sauce thickens, or about seven minutes, stirring occasionally. You'll know it's ready when the sauce coats the back of a metal spoon and holds its shape when you swipe your finger through it. This is called nappe', as I've mentioned before. Add salt and pepper to taste.

While the sauce does its magic, cook your asparagus. Get a nonstick skillet warmed up over medium to med-high heat and give it a swirl of olive oil. Add as much or little garlic as you care to and saute until the garlic just begins to gain some color. Add your asparagus and give it a toss to coat the veggies in olive oil and garlic. Cook the asparagus until it softens slightly and begins to pick up some color of its own.

Warm the remaining cream for a few seconds in the microwave. Then simply go to town with your favorite potatoes masher or a hand mixer if you so choose. Once the potatoes have been mashed, work in the butter and cream and blend it all into one amalgamous mixture.

To serve, place a good pile of potatoes on each plate. Top with a scoop of delicious scallops, then place a few stalks of asparagus off to one side slightly. Give the whole thing a bit of sauce, and sprinkle with bacon and chives. That's it, you're done!


Ok, so maybe it looks a little complex once I write it all out, but it's really not all that bad. Trust me, this may seem like a handful of steps, but they're all pretty basic steps if you really stop and break it all down: prep and make mashed potatoes, saute some asparagus, saute scallops, make a basic sauce, combine. That's it! Trust me, it's easy.

And totally worth it too. The scallops have a natural sweetness to them, and they lack any of that "fishy" smell that turns off so many people. Moreover, the potatoes are rich (but not too rich), and the asparagus provides a nice counterpoint both in texture and in flavor.

If I were to offer any critique of the meal, it's that the scallops can get lost in the potatoes. This is simple because they are so small. You don't lose the flavor much, it just gets mixed in with the rest of the dish. To be honest, I would have preferred to use the larger, meatier sea scallops, which are three times as big. The problem was they were also three times the price, so I had to pass. Maybe next time though.

Anyway, I hope you enjoyed this post. And I hope you'll go out there and give this method a try. It'll impress and amaze your friends, I guarantee!

Comments and suggestions are welcome as always. Until next time, go forth and eat well!

Saturday, September 6, 2014

F.E.A.S.T.: Indian-style Curry Sauce

Hello again, dear readers!

This week's humble offering is the result of a two-part challenge I recently issued to myself. Well, I say that, but it didn't exactly develop that way. You see, I wanted to create a new F.E.A.S.T., mostly because I haven't done one in a while. I've also been wanting to try making a curry sauce, since I've never actually done that before. Lo and behold, the idea came: why not do both?

Before I jump into the ingredient list, I feel I should also admit something: I'm not very familiar with Indian food. In fact, I can't honestly recall but maybe one or two times in my life where I've actually eaten it. Don't get me wrong: I have nothing against the cuisine. It's just not ever something where I've said to myself, "Self, what d'you say to some Indian food?"

That being said, I can neither confirm nor deny how "authentic" this dish is. I basically looked up a few basic curry recipes and then came up with my own using the common ingredients and what sounded tasty. I have it on the authority of those who tried it that it does in fact taste like Indian-style curry, however. So that's something, right? Regardless, it was quite good, and I highly recommend you give it a try, if only so you can say that you have!

WHAT I USED!!!
1 yellow onion, sliced  ($1.0)
2 tsp minced garlic (or about four cloves)  (stock)
1 inch ginger, peeled and diced  ($0.5)
1 red bell pepper, roughly chopped  ($3.0)
1 8oz can tomato sauce  ($1.0)
1 4oz can green chiles  ($1.0)
1 6oz tub plain Greek yogurt ($1.5)
1 cup cilantro ($1.0)
2 tsp turmeric  (stock)
2 tsp cumin  (stock)
2 tsp coriander  (stock)
1 tsp paprika  (stock)
1 tsp cinnamon  (stock)
1 tsp cayenne pepper  (stock)

Final price: $9.0 for the whole thing.

OK, I admit, some of you may not obsessively keep as many spices on hand as I do. But let's say you do have to go out an buy some of them. You're still getting away for pretty cheap, since you only need a little bit out of each jar, right? That means you'll have everything on hand to make the curry again, and that's just a win-win situation in my book.

WHAT I DID!!!
In a large saucepan, heat a few tablespoons of vegetable oil over medium-high to high heat. Toss in your onion and bell pepper, and saute them until the pepper softens and the onion starts to brown, about 10 to 15 minutes. Drop the heat to low, then add your ginger and garlic and cook for 2 to 3 minutes longer.

Add all six spices and whisk well to combine. Add in your tomato sauce, green chiles, and cilantro. Once that's all incorporated, slowly whisk in the yogurt.

Now, working carefully, drop the whole mix into a blender or food processor and start pulsing. Add about a cup of water, then blend until smooth.

Put the mix back in the saucepan over low heat, and let it simmer for about 20 minutes, covered. Serve over rice, chicken, vegetables, or whatever you like.


And there we have it. Let's compare to our acronym:

Fast: The whole process took me about an hour to concoct. Admittedly, with the rice and chicken, it was closer to an hour and a half, but the sauce itself was relatively quick to make, even with the simmering.

Easy: Yes, I'd say so. I could've been a lot more complicated, toasting the spices, using fresh spices (I wish!), adding more exotic ingredients, but I decided that what I had would suffice. And guess what? I was right!

Affordable: At under $10 to serve four to six people, we're doing just fine financially. Even if you do have to spend a little more to acquire some of the spices, you still come out ahead, since now you have said ingredients on hand and ready to go for the next time.

Super Tasty: Hell yeah. This curry is rich and savory, with a smoky subtle heat to it that you just have to experience to truly understand. Honestly, I am actually quite pleased with how it turned out.

I wish I could better explain the flavor, but beyond calling it "exotic," I'm a bit at a loss for words. So, I challenge each of you reading this to go out and craft this wonderful sauce for yourselves so you can be at a loss for words as well. I promise you won't regret it.


Anyway, as always, thanks for reading. If you have any comments or suggestions, I'd love to hear them.

Until next time, go forth and eat well!

Sunday, August 31, 2014

Molten Chocolate Souffle with Creme Anglaise Sauce

Hello everyone!

So yes, it has been a while hasn't it? But the dry spell is over, and it's back to business as usual.

Today's humble offering comes from a video that someone posted on my Facebook page: individual molten chocolate souffles with creme anglaise sauce. They looked amazing. So I went looking and found the actual recipe here, which also happens to contain the how-to video as well. It's definitely worth a watch. But if you're impatient and just want to see what the darn things look like, then wait no more!


Trust me, they taste even better than this picture shows. And the video makes them look even better.

Ok, now here's the catch: the recipe comes in grams and ounces, so that means all the ingredients have to be measured by weight. I happen to have a food scale, so this wasn't a huge issue for me. I do realize however that not all of you have a food scale, so you may be a bit put off. I'd like to say, "Fear not! For I have converted everything to volumetric measurements for your peace of mind! Rejoice!" But I can't. The fact is that in baking, measuring dry goods by weight is just more accurate.

That being said: okay, yeah, I did kind of convert some of it as I went. But I strongly encourage you, if you want to do the thing properly, to go out and just acquire a food scale. Honestly, they're not even pricey.

So, without further ado, let's jump right to it!

WHAT I USED!!!
For the souffles
6.6oz whole milk
1.2oz bread flour (about 1/2 cup)
1.2oz butter
3.5oz sugar
3 egg yolks
5 egg whites
4.8oz 70% dark chocolate, chopped fine
a pinch of salt

For the creme
2 vanilla beans
8.8oz heavy cream (just over 1 cup)
4.4oz whole milk (just over 1/2 cup)
1.8oz sugar (about 1/4 cup)
3 egg yolks
a pinch of salt

WHAT I DID!!!
For the souffles
Preheat the oven to 375. Using some extra, butter the insides of 3 small oven-safe ramekins, making sure to get complete coverage. Sprinkle some extra sugar into each, rotating the ramekin to completely cover the butter with sugar. This gives the souffle the grab it needs to climb the ramekin and rise up.

Using your hands, combine the salt, butter and flour into a paste. Heat the milk and the sugar to a brief boil over medium heat, then drop in the flour mixture and whisk to combine. This should not take very long at all. Add the chocolate and whisk to combine, then work in the egg yolks.

Meanwhile, beat the egg whites in your stand mixer (or get a trusty minion to use your hand mixer) until they reach soft peaks. You'll know you have soft peaks when you can dip the beater into the egg foam, pull it out, flip it over, and see mountain-like peaks that fall over if you gently tap the beater with your hand. Add a little extra sugar, and continue to beat until you get stiff peaks. These peaks don't fall over as easily, hence the name.

Take a scoop of the egg white mixture and stir it into the chocolate base, just to loosen things up a bit. Then fold the rest of the whites into the chocolate in about three stages. You do this by making cutting-and-flipping motions with a spatula, rather than traditional stirring motions.

Fill each ramekin right to the top, and use the back of a knife to level off the surface. Place the ramekins on a cookie sheet and bake in the oven for about 17 minutes. When they come out, garnish them with powdered sugar and the creme anglaise, which you should have already made.

For the creme
Chop your vanilla beans into a fine dice. Combine the beans with the cream, milk, sugar, and egg yolks, and whisk well. Heat over medium-high heat, whisking constantly, until the mixture hits about 180 degrees or it makes it to the nappe stage. This is when the mixture will coat the back of a metal spoon completely. If you swipe your finger through it, the sauce will still adhere to the spoon and keep its shape without running.

Whatever you do, do not let it over-heat like I did! (What? It was my first time making the stuff.) It really will not take very long at all to be done.

When it's ready, strain out the beans and cool before serving over your souffles.


There now, ain't that just sexy?

As I said, I did over cook the sauce a bit, so the eggs curdled. It was tasty, it just didn't have that rich, velvety smoothness that it should've had. The souffles, though, turned out wonderfully. I didn't get quite as much rise as in the video, but I think that had to do with the shape of my ramekins (they have a lip, and the recipe calls for completely smooth sides). Still, they had a wonderful chocolateyness to them that I loved. I can't wait to make these again!

Anywho, I hope that you enjoyed this long-awaited entry to my blog. If you have any comments or suggestions, I look forward to hearing them.

Until next time then! Go forth and eat well! 

Thursday, July 3, 2014

Jalapeno Popper Mac & Cheese Stuffed Peppers

Hello once again, loyal readers!

So. This title. It's a doozy, isn't it? Well, before your question my sanity, let me explain.

In the past few months, I've really started to develop a love for spicy foods. Not super over-the-top why-God-why? spicy, but the the kind of spicy that just gives you a good kick as you eat it. As such, I've also come to love jalapeno poppers.

For those not in the know, a jalapeno popper is simply a hollowed out jalapeno stuffed with cream cheese. Often times the filling will contain chicken. Often times the entire thing will be wrapped in delicious, delicious bacon. Sometimes they're even deep-fried.

Yeah. They're tasty.

So I thought to myself: how could I add to that awesomeness? Well, I thought, they already have cheese inside, so what could go well with that? Simple: pasta! And spicy mac & cheese totally happens all the time down in the Caribbean, so there's all the precedent I needed.

But, the idea of trying to cram noodles into jalapenos (which are not exactly large) seemed questionable. So then I thought, what if I deconstructed the popper, mixed it into the macaroni, and then stuffed all of that into a different pepper? Hence this idea was born! Behold!!

WHAT I USED!!!
6 bell peppers, caps removed (and saved), inner cores and seeds removed
6 jalapenos, seeds similarly removed, and julienned (that's cut into strips)
4 boneless skinless chicken breasts, cubed
1 medium yellow onion, diced
1 package bacon, cooked and diced
4 tbs butter
4 tbs flour
1-2 cups milk
2 blocks cream cheese, cubed
2 cups (8oz) elbow macaroni
shredded cheddar cheese for topping the peppers

WHAT I DID!!!
First, cook your chicken. I did what I always do: a little olive oil, some salt and pepper, medium to medium high heat in my favorite skillet, cooked until all the pink is gone. It only takes a few minutes. Oh, and be sure to drain the chicken well when it cooks.

Next, melt the butter in a saucepan over medium heat. Add the onion and jalapenos and saute until the veggies soften. Sprinkle the flour over the veggies and cook for two to three minutes to form a roux. Add enough milk to create a sauce. (I admit, I didn't measure this, but it was somewhere between one cup and two.) Once you have a base sauce, incorporate the two cream cheese blocks one at a time. Once it's all completely melted and formed into a cheesy saucy consistency, stir in the bacon and the chicken.

Meanwhile, boil your pasta to al dente, following the packages instructions. Once the noodles are done, drain them thoroughly and add them to the cheesy-bacony-chicken sauce.

Now, scoop the mixture into the hollowed-out peppers. You're going to have left over filling most likely. Arrange the peppers in an oven-safe dish so they will sit upright. Sprinkle the mixture with your shredded cheese, and replace the caps. Bake at 350 degrees for 25 to 30 minutes or until the peppers have softened. Serve with the sides of your choice.


These came out quite well, I am very pleased to say. The mac & cheese filling had the perfect balance of heat from the jalapenos, savory saltiness from the meats, and sweet cheesiness from, well, the cheese. It tasted just like a jalapeno popper spliced with warm comforting mac & cheese, which was, after all, the entire point.

If I were to offer any criticism of the meal, it would be that the bell peppers seemed almost extraneous. The filling was definitely the star, which is good. But since the original idea was to add mac & cheese to a jalapeno popper, the bell peppers didn't seem to contribute much. Not that they weren't tasty, mind. They just didn't really add much to the dish.

I think next time I may go with my original idea of stuffing the mac & cheese inside the jalapeno. I may even deep-fry the suckers just for the hell of it! Maybe it'll work, maybe it won't, but I'm willing to try it and see!

As always, thanks for reading. Comments, suggestions, thoughts, and especially new ideas are always welcome. Until next time, go forth and eat well!

Sunday, June 22, 2014

Adventures in Food: Brick-Oven Pizza

Hello all!

So I don't have a recipe or anything for you today. Or rather, I would, if I thought everyone out there had brick ovens in their backyards. Since I'm guessing most of you don't, I'm just going to be sharing a little of my experience today, and you can all be jealous of the fun I had. Aren't I the greatest?

A little background: one of my roommates, the one with more siblings than I can count (four hundred and thirty six I reckon), has a brother who recently completed construction of a full-sized brick oven in his backyard. And, even cooler than having a working forno, he regularly invites friends and family over to make use of the thing. So the other day we trekked over to his house and made brick-oven pizza, just because we could! Ok, it was one of the other sibling's birthday as well, but who's keeping track, right?


By the time we arrived, the fire was already blazing hot and near ready to go. Impressively, the forno regularly hits temperatures in the latter few hundreds, going so high as a thousand degrees if you let it. Yeah, you read that right: a thousand degrees. He also had the pizza dough waiting, so the first thing we had to do was divide it up into individual balls and they were ready to go.

Next, we worked on our toppings. We sliced up some fresh mozzarella and a few more non-traditional cheeses (like Gouda). We made a simple tomato sauce out of a can of crushed tomatoes, some fresh green basil, and a few garlic cloves. We chopped onions and peppers and a few different deli meats even, pulling everything out that could possibly go on a pizza. Oh, and a bag of sliced pepperoni, too. Because sometimes you have to go with the classics.

Then it was time to stretch out the dough. He has a few different peels, wide wooden paddles with long handles for moving the food around. The idea was to flour the peel and gently stretch the dough across it to create the crust. You had to constantly check that the dough would easily slide around on the peel, because if it stuck when you tried to slide it into the oven, you'd be left with a mess. Once that was done, you could top the crust with the sauce and meats and veggies and cheeses of your choice, to create whatever pizza your little heart so desired.


After that came the actual baking. First, we checked the fire with a laser thermometer. For those who don't know, it's exactly what it sounds like: a laser pointer that reads the temperature of whatever or wherever you direct it. I want one. Not 'cause, y'know, I really need it per se, but just because I want it. Then we simply slid the pizza inside. Picture it this way: a big dome where there's a blazing hot fire pushed to one side, with a spot left in the middle for the food. All in all, the whole process takes about, oh, two to three minutes per pizza. Don't believe me? Let's go to the video:


Ok, so my camerawork still needs a little, uh, work. But yeah, that fast.

Trust me, this pizza was delicious. I'll need to get his pizza dough recipe, because I want to find out if I can actually attempt to duplicate the magic in my plain old boring regular oven. I doubt it, though. The live fire adds a smokiness and an earthiness to the crust, but it bakes so fast that the dough doesn't have time to get dry and tough. The result: a warm velvety interior with a crunchy exterior. And the cheese melts so perfectly, it's practically a solid and a liquid at the same time. Even the toppings manage to crisp up, including the veggies. Since I don't care for raw veggies on my pizza, this is a big plus for me. All and all, as I said: delicious.

In the end, this was a very fun experience. I look forward to going back in the future to repeat the process. Sure, it takes a little more work than simply ordering delivery, but the process really is half the fun, and the results are more than worth the effort.

Join me next time when I'll have something I came up with from scratch! As always, I welcome comments and suggestions. Especially the suggestions; I need some new wacky ideas.

Until then, go forth and eat well.

Sunday, June 8, 2014

+3 Flaming Chili

Hey everyone!

Today I have for you one of my all-time favorite things (and yes, I admit there are a lot of them) to make: chili.

The cool thing about chili is that it's actually really easy to make, and there's a ton of space left open for interpretation. Don't mistake easy for simple, though. The easiest things to make are often times the easiest to screw up, so you have to pay attention to what you're about. But, once you know what you're doing, you're golden.

Now, my chili recipe is the way I like it. I know that there are true chili aficionados out there, especially here in the Great State of Texas, who will tell you that chili should be meat, sauce and spices. That's it. No beans. No tomatoes. No nothing. But dammit, I like that stuff in my chili. To me it helps to round out the dish and turn it into more of a complete meal. So, if you want to be picky about having "authentic" chili, you'll have to look elsewhere. Me, I'm going to stick with what I like!

WHAT I USED!!!
1 onion, diced
A few tsp minced garlic
3lbs ground beef
1 7oz can chopped green chiles
1 6oz can tomato paste
2 14.5oz cans Rotel (diced tomatoes with chiles)
1 16oz can pinto beans, drained and rinsed well
1 16oz can kidney beans, ditto
3 Shiner Bock beers (or other good dark beer)
1 can chipotles in adobo sauce (optional, for a little extra kick)
about 3tbs Worcestershire sauce (optional, but I think it adds a nice smokiness)
1/2cup masa harina (corn flour) mixed with 1cup H20
3tbs Chili Powder
     (To make Chili Powder, combine the following and mix well:
     - 3tbs ancho chile powder
     - 2tbs cayenne powder
     - 2tsp cumin powder
     - 2tsp ground oregano
     - 1tsp garlic powder
     - 1tso onion powder)

WHAT I DID!!!
First, dig out your biggest skillet and saute your onion and garlic over medium heat with a little salt until soft and translucent. Add the beef, brown thoroughly, and drain the fat.

Meanwhile, in a large pot, dutch oven, or slow cooker, combine the chiles, tomato paste, Rotel, both beans, and the beer. If you're using the chiptoles, and they aren't already chopped, pull them out of the sauce. Cut them open and scrape out the seeds, then dice fine. Add them and the adobo sauce from the can into the pot. Add the Worcestershire sauce, if using, the 3tbs of Chili Powder, and the masa harina slurry. Set the whole thing over medium-low heat, then add the meat and onions. Bring to a simmer.

Simmer for at least 1 hour, though more is fine, stirring occasionally. Lower the heat if it gets too hot; you don't want the bottom to burn, right?

When at least an hour has passed, check your seasonings and adjust to taste. If the mixture is too liquidy for your preference, add more masa in a 1:2 masa to water ratio (such as 1tbs masa mixed with 2tbs water).

Serve with shredded cheese, sour cream, and corn bread on the side.


So delicious. And like I said, it is fairly easy to make. You just have to pay attention to the heat and your meat and your seasonings to get it right. This chili is wonderfully savory, with just enough spice and heat to make you pay attention. But you can always adjust the heat by adding or subtraction Chili Powder to the mix.

Even better, it's chili, so you can play around with it! Add more peppers if you want more of a kick. Use ground turkey or pork or buffalo if you want to change up the meat a bit. I tried using chorizo once, but it didn't really work. Of course, I'd never worked with chorizo before, so I probably messed it up in the initial execution. Regardless, it was worth trying!

I hope that some of you will give this a try and tell me what you think of it. I've developed this recipe over several attempts, using multiple sources for inspiration. The Chili Powder recipe comes from the internet, I admit, but I really like it and so have used it constantly. But the rest has come from my own trial and error, and I'm quite proud of it.

Meanwhile, if anyone out there has suggestions for something crazy to try, I look forward to getting some new ideas!

Until next time, go forth and eat well!

Monday, May 26, 2014

F.E.A.S.T.: Parmedijon Chicken

Hello everyone!

Today I have a new method for you, a F.E.A.S.T. that is guaranteed to jazz up plain old boneless/skinless chicken. It's simple, straightforward, and surprisingly tasty given how little goes into it. I call it Parmedijon Chicken, a name that I totally did not make up for the sake of a snazzier-sounding blog post.

In all honesty though, I highly recommend you try this. My mother has been making it for years and it's always a hit. I think you'll be impressed with how easy it is to make, especially when you compare that fact to the results. But as usual, I'll just let the food speak for itself.

WHAT I USED!!!
3 boneless/skinless chicken breasts  (stock)
3/4cup panko bread crumbs  (from a $2 box)
3tbs melted butter  (stock)
approx. 1/3cup freshly shredded Parmesan cheese  (from a $5 block)
approx. 3tbs honey dijon mustard (stock)
salt & pepper to season/taste  (stock)

Check out that list! I told you it was simple. But wait, it gets better!

WHAT I DID!!!
Preheat the oven to 500 degress, and line a baking sheet with aluminum foil. Lay out the chicken. Smear the top of each breast with the honey dijon, using as much or as little as you like. Sprinkle with salt & pepper.

Combine the panko, butter, and cheese in a bowl. Using your hands, mound this mixture onto each breast, applying gentle pressure to ensure it all sticks.


Bake for 10-15minutes, or until the chicken is cooked through and the topping is Golden, Brown, and Delicious. Serve with the side or veggies of your choice.


There. That's it. Simple. Easy. But oh so tasty. The chicken cooks quickly, so as long as you watch it it won;t have time to dry out. Aside from that one issue you're golden. Let's take a look at our acronym:

Fast: The whole process took around a half hour to make, so yeah, I'd say so.

Easy: Did you see that method? Anyone can do it!

Affordable: I keep frozen chicken on hand at all times, so the whole meal came together for under $10. And it fed three people, so not bad.

Super-Tasty: Yes, yes, yes. The mustard and the cheese combine together in a very pleasant way, sweet and salty, savory and spicy. The chicken cooked perfectly, having no time to dry out because it cooks so fast. And the panko provides a nicely contrasting crunch. Overall, delicious!

So, I would have to say this is one of the best weeknight quick-and-easy meals you're ever likely to make.

And it's so easy to adjust too! If you need to feed more people, just add more chicken and up the panko by a 1/4cup and the butter by 1tbsp per breast. You'll need to increase the cheese and mustard correspondingly, of course, but I reckon you figured that out. And if you don't have panko, you can always grind up some plain old sandwich bread in your food processor to make breadcrumbs. Just use about 1 slice per each breast, and you're set. It won't be as crunchy, but it still works in a pinch.

Anyway, I hope that some of you will give this a try and let me know what you think. I always hope to see feedback from my readers.

Until next time, go forth and eat well!

Sunday, May 18, 2014

Sauerbraten Dinner

Hello again!

So I've been wanting to try making saurebraten for a while now, but I just hadn't ever gotten around to it. You know how it goes, right? Who can be bothered to make a dish that needs half a week to prepare? We're all busy folks, and none of us has the time to just decide, "huh, how about a German pot roast/brisket marinated in vinegar for dinner?"

Well I'm here to tell you that not only is this in fact doable, it's actually pretty easy, especially if you can cheat a bit!

As is my M.O., I started with the Alton Brown method for sauerbraten, but I made a few changes. He calls for a bottom round, but I used a brisket. I was fairly confident that it would work, since the method found here used brisket as well, and the methods are very similar. I did follow the braised cabbage recipe from that page too, but I'll get to that shortly.

Also, I couldn't find juniper berries, but the interents suggested subbing in some gin, which I thought was brilliant. Last, I decided to just throw the whole thing in a slow cooker, because let's face it, those things are magic. To round out the meal, I also made braised cabbage, as I mentioned before, and pretzel rolls, based on this recipe here.

All in all, it was a good meal, which is why I've decided to share it with y'all, my loyal readers.

Without further ado, let's jump right to it!

THE INGREDIENTS!!!
For the sauerbraten:
2cups water
1cup cider vinegar
1cup red wine vinegar
1 medium onion, chopped roughly
1 large carrot, ditto the onion
1tbs + 1tsp kosher salt
1/2tsp pepper, fresh ground
2 bay leaves
6 or so whole cloves
1tsp mustard seeds
a good splash (maybe 1/4cup?) gin
3 1/2 - 4lb beef brisket
vegetable oil for rubbing the brisket
1/3cup sugar
around 18 old fashioned gingersnaps, crushed

For the cabbage:
5tbs unsalted butter
1/2 medium red onion, diced
1 medium white onion, also diced
2 granny smith apples, peeled and diced
1 large red cabbage, cored and sliced thin
about 2/3cup dried cherries
1 1/2cup red wine, like a shiraz
2 whole cloves
1/3 cup brown sugar
1-2 bay leaves
a good splash of cider vinegar
juice of half a lemon

For the pretzel rolls:
1 1/2cups warm (not hot!) water
1tbs sugar
2tsp kosher salt
4 1/2cups AP flour
1 package rapid-rise yeast
2oz unsalted butter, melted
10cups water
2/3cup (yep!) baking soda
1 egg yolk beaten with 1tsp water
more salt for sprinkling

(Ok, yeah, that's a lot of stuff, but a lot of it is cheap or else a staple, so just bare with me. I'm going to show you how easy this is in the method below. Just read the whole thing.)

THE METHOD!!!
Start the meat. Turn on a fan ('cause, y'know: vinegar!) and bring the water through mustard to a boil. Then drop the heat and simmer for 10min. Set aside to cool, then add the gin.

Pat the meat dry, rub with a little oil, and sprinkle with salt. Heat a large skillet over high and brown the brisket on both sides. It should take 2-3min per side. Let that cool, then drop (not literally!) the meat into the marinade. Stash the whole thing, covered, in the fridge for around 5 days. Yes, 5 days. Be sure to flip the meat over every day if it's not completely submerged.

The morning you want to eat, pull out your slow cooker. Set the thing on its lowest, longest setting (mine was for 10hrs) and put the meat and marinade within said vessel. Don't forget to add the sugar like I did. When you get home, switch the setting to warm and work on the rest.

Oh, and at the last minute, strain the solids out of the marinade and discard. Put the remaining liquid in a small pot and place over med-high heat. Whisk in the gingersnaps to form a sauce, adding a bit of water of it gets too thick. Serve sauce over the meat.

To make the pretzel rolls, drop the water through butter into your bread maker and turn it on to the dough setting. Don't have a bread machine? That's ok, just follow the method in the link above. When the dough is done, bring the 10cups of water to a boil with the baking soda. Roll the dough out into 16 even pieces and form into balls. Give each a 30sec bath in the water, then place on a cookie sheet. Brush each with the egg wash and sprinkle with salt. Bake at 450 for 12-14min, or until GBD (golden, brown, and delicious).

Meanwhile, while the dough is doing its thing in the bread machine, start the cabbage. In a large pot, melt the butter over medium heat. Add the onions and apple and saute for 5min, or until the onions are translucent. Add the cabbage through the bay leaves and bring the whole thing to a boil over medium high. Cover the pot, reduce the head, and simmer for 1 hour, stirring occasionally. Remove the bay leaves (if you can find 'em!) and the vinegar and the lemon juice.

See, now wasn't that easy?

...Ok, yeah, it's still kind of daunting, isn't it? But I promise, it's worth the time and effort to make this meal.

The brisket came out perfectly tender, and was fall-apart-in-your-mouth delicious. Like I said though, I forgot to add the sugar to the marinade at the end. As a result, I think we lost a little bit of the sweetness we should have had, and the meat had a bit too much acidity. The cabbage was also quite good, crunchy and tender, aromatic and sweet. The pretzel rolls were also phenomenal, perfectly salted, and kind of stole the show.

I think next time I make this meal, I'll be sure to sweeten the marinade for the actual cooking process, so as to get the flavor balance correct. Other than that though, I'd call the meal a success. I hope that if you are brave enough to try it for yourself that you have as much luck as I did.

As always, thanks for reading. I look forward to seeing some feedback on how y'all think I'm doing here.

Go forth and eat well!

(Oh, by the way: you're probably asking yourself, "where are all the pictures he usually posts?" Well, unfortunately, all the pictures came out blurry, so none of them are worth sharing. Sad times, right? I really need to get a better camera...)

Sunday, May 11, 2014

Restaurant Review: Benihana and The Londoner (take 2)

Hello again, loyal readers!

I recently went out for another friend's birthday, during which time we went to not one but two different restaurants: Benihana for lunch and The Londoner for dinner. I am pleased to report that a good time was had by all, so I would like to offer up a pair of quick reviews to entice and amaze you.
Without further ado:

Benihana
The Place: Benihana is your typical Asian-inspired restaurant, sparsely decorated with bamboo and paintings of kanji. The real show, however, comes at the table. As with any hibachi restaurant, they seat you around a large flat-top griddle rimmed with a counter for plates and drinks. Once you've placed your order, a chef comes by, cranks up the heat to high, and prepares everything right in front of you. Yes, you get to watch as everything from the fried rice to the steak is cooked before your eyes. They even throw in a few tricks, such as a stack of onion rings made to steam like a volcano. I'm sure most of you are familiar with the concept, but if you've never been it really is a fun experience.

What I ate: Since it was lunch time, I ordered the Lunch Boat served with chicken. It also came with steamed rice (I upgraded to the fried rice, though, 'cause why not?), onion soup, salad, edamame, sashimi, sushi, fruit, tempura shrimp, and a partridge in a pear tree. It sounds like a lot, but it was definitely an appropriately-sized portion for lunch. One of my friends, the birthday girl in question, ordered a bit more ambitiously and let me try her jumbo shrimp and filet mignon. I am pleased to report that all of the food was fresh, delicious, and wonderfully prepared.


My thoughts: As I said before, it really is an experience going to a place like this. The service was excellent, the chef was very entertaining, and the meals were quite tasty. As for my rating? I'm hovering at around a four out of five stars. Don't get me wrong here, I was quite satisfied with my meal. But, while well prepared, the food was not so astoundingly delicious as to merit a perfect score. Still, even a 4/5 is a solid score in my book, and one that I would gladly revisit in the future.

The Londoner
The place: Nothing has really changed since my last review. It's an English-pub-style joint, 'nuff said.

What I ate: This time, they had Magner's hard cider (on tap!), a personal favorite. I eagerly ordered a pint. Of course, the Cheesy Hampton fries were ordered once more, and they were as tasty as they were before. This time around, I ordered the Steak & Ale Pie in a further attempt to eat appropriately-themed food wherever I go. This steak, mushroom and onion concoction, more of beer-infused stew, came topped with puff pastry and served with baked beans and mashed potatoes. The steak was quiet good, although the pastry got soggy really fast. Still, it was quite good, The potatoes were about what you'd expect, but the baked beans were positively wonderful. I think they may have been the best thing I've eaten there yet. Overall though, a much better meal this time around.


My thoughts: Last time, I rated the Londoner at about 3.5/5 stars. I think I'm willing to upgrade that to a 4, but I'm not quite sure to be honest. The food was good, but was it four-star good? Hmm... I may need to go back a third time to really get a handle on this place. For now, I'm going to rate it at 3.75 out of 5 stars, which is weird, I know. But I'm just not totally convinced that it should be bumped all the way up to a full four. But anything over three stars is good food, so don't let me deter you; go check it out for yourself!

Anyway, thanks for reading as always. And as always I look forward to hearing back from anybody who would like to leave feedback!

Go forth and eat well!

Sunday, April 27, 2014

Happy Holidays: Easter Dinner

Hello again! Did you miss me? I hope you did, 'cause I'm back!

So as you know, last weekend we celebrated Easter. And of course, in my family, celebrating a holiday means cooking up something special for dinner. The choice this year: ham or lamb. Well, it was no contest. Don't get me wrong; I enjoy ham as much as the next fellow. But c'mon... lamb. Pardon my drooling, but it's juicy, tender, and delicious in a lot of ways.

The next step: how to prepare it. We brainstormed for a bit and then I went hunting in the wilds of the Internets in search of a method we would all like. And I found one here. It was just what I had been hoping to find. We had bandied about with the idea of doing a Greek menu, and this seemed to be the perfect fit for just that.

So we planned out the meal, went shopping, and were all ready to go Sunday afternoon/

Then my dad said, "Son, why don't you take the lead with dinner tonight?" Gulp.

Ok, it was just my parents and me, so it wasn't like I was cooking for two dozen people on Thanksgiving or anything. But still, taking the lead on a holiday... I guess there's always a first time, right? So I plucked up my courage and set about getting it done and getting it done right.

Here's what I made:

THE INGREDIENTS!!!

For the lamb:
4-5lb boneless leg of lamb
6oz spinach, chopped
1/2cup fresh mint, chopped
1tsp(about) fresh ground black pepper
1tsp(ish) salt
2tsp(sorta) minced garlic
1/2cup feta cheese, crumbled
1/2cup onion, chopped
1cup panko
1/4cup plain Greek yogurt
1/4cup half-and-half
2 eggs
more salt
more pepper
olive oil
fresh rosemary, chopped fine

For the sides:
10oz package couscous
1lb asparagus
2cups sliced strawberries
4cups baby spinach
1/4cup + 2tbs lemon juice, divided
6tbs olive oil, divided
2tbs honey
fresh thyme, finely chopped (or Italian seasoning)
1/4cup fresh mint, chopped1/3cup pecans, lightly toasted and chopped
salt
pepper

THE METHOD!!!
For the lamb:
Preheat the oven to 425. Unroll the leg of lamb (skin side down) and pound on it a bit to flatten things out. Use a knife to facilitate spreading if need be. Mix the spinach through the eggs together in a large bowl. Spread the mixture over the lamb, taking care not to overstuff. Roll it up like a jelly roll and tie into place with butcher's twine. Rub the outside of the lamb with olive oil and sprinkle with salt, pepper and rosemary.


Place the meat in the oven-proof vessel of your choice, and spread any remaining filling around the lamb. Roast in the oven for 15minutes, then drop the temperature down to 325 and go for another hour. When it's done, let it rest for 10-15minutes, lightly covered with foil, before serving.


And yes, it tastes as good as it looks!

For the sides:
Prepare the couscous according to the package's directions. When it's done, add 2tbs lemon juice, 3tbs olive oil, the mint, the pecans, and salt & pepper to taste. Serve warm.

Meanwhile, trim the asparagus to rid yourself of the woody base. To do this, use this trick my sister taught me: hold each stalk at its base and around the middle. Bend the stalk gently. If all goes well, the end should snap off right where you would want it to. Cut the asparagus into 1inch lengths. Drop the asparagus into boiling water for 3-4minutes to blanch them. This will improve their color and texture as well as cooking them. When they're done, drop them into a bowl of ice water to stop them from overcooking.

Combine 1/4cup lemon juice, 3tbs olive oil, 2tbs honey, a dash of salt & pepper and your thyme in a small lidded vessel, like a mason jar. Microwave for less than 10seconds, just to help melt the honey down. Shake to combine. Toss the dressing with the asparagus, spinach and strawberries, and serve as a salad.


TA-DA!!

And there you have it, folks, a delicious lamb dinner! And y'know? It was actually all pretty easy, too. I mean, it's mostly just chopping and mixing. The best part was that I never felt like I was rushed or otherwise pressed for time. Everything happened as it was supposed to, and it all turned out pretty well. All and all, I declare the meal to be a great success!

Well, I hope you enjoyed sharing this experience with me. And I also hope that some of you will give this or some other method a try, especially if you've never had lamb before. Trust me, you'll love it!

As always, comments are appreciated. Go forth and eat well!

Wednesday, March 5, 2014

Restaurant Review: The Londoner

Hello readers!

Over this past weekend, I helped celebrate one of my closest friend's birthday. To honor the day, we all went out to eat at The Londoner Pub & Grill in Frisco. The company was of course excellent, and good fun was had by all, but the dining experience itself, while certainly not terrible, was a bit... lacking in a few areas.

The place: The Londoner is done up British pub style, with lots of deep colors and dark-stained hardwoods. A few TVs, which were airing European football of course, are scattered across the restaurant. Yet, despite that, it lacks that "sports bar" feeling, which is something I honestly have to be in the right mood to enjoy. British paraphernalia lines the burgundy walls, including a portrait labeled "The queens of England" featuring Queen Elizabeth, Sir Elton John, and Freddie Mercury. Overall, the Londoner enjoys a relaxed, comfortable atmosphere, although I don't doubt things get a little crazy around World Cup time.

What I ate: To begin, I helped consume a plate of their Cheesy Hampton Fries. If you ever go, I highly recommend trying these out, as they are an entire pound of fries smothered in aged white cheddar and applewood-smoked bacon. Delicious, to say the least. Along with that, I was able to order a Belhaven Scottish Ale (which they had on tap!), a personal favorite when it comes to imports. If you go expecting to have a wide variety of beer and spirits from which to choose a beverage, you won't be disappointed.

Now. My entree. As I was in a British-style pub I wanted British-style grub, and as such ordered Bangers and Mash. For those of you unfamiliar, that would be sausage and gravy with mashed potatoes served over a crusty piece of bread called a Yorkshire pudding. The sausage was wonderful, savory and a little spicy, and I absolutely loved the red onion gravy that came with it. And the potatoes were prepared perfectly. The bread, however, was dry, dull, and burnt on the end, so there I was considerably less than impressed.


My thoughts: Overall... I liked the place. Would I go back? Maybe. The food ranged from delicious to just "meh," and our service that night was distinctly lacking in quality. One of my friend's meal must've gotten lost somewhere, because she had to wait an additional twenty minutes for her food to hit the table. I think maybe it was just a bad night for them, or maybe our server was overwhelmed by our group. Despite that, I give the place a tentative 3.5 out of 5. I want to try some of the other entree and appetizer options before I give a final opinion. I guess that means I'll just need to go back one of these days!

Well, thanks for reading. As always, I hope to hear back from you on what you think of the blog. Go forth and eat well!

Sunday, February 23, 2014

Take Two: Fish Pouches

Hello friends!

This past week I decided to try my hand at the fish pouches again. As you may recall from my last attempt, the results were of a mixed success. I am happy to report that I got much better results this time. Unfortunately, I don't think it quite qualifies as a F.E.A.S.T. anymore, but I'll let you be the judge.

THE INGREDIENTS!!!
4 flounder fillets  (from a $4.50 frozen bag)
1 cup uncooked white rice  (don't ask the price; I'm pulling this from a huge bag)
1 cup golden yellow grape tomatoes  (from a $3.50 package)
1 red bell pepper  ($1.00)
1 medium sweet yellow onion  ($1.00)
2 14.5oz cans veggie broth  ($2.00)
2 small lemons  ($0.50)
chopped garlic, about 8 cloves worth  (staple)
Italian seasoning  (staple)

salt and pepper  (they better be staples!)


Total price: about $12.50, unless you need to restock your staples.

THE METHOD!!!
Preheat your oven to 425. Tear off four large sheets of parchment. Line a cookie sheet or other containment vessel with foil (for ease of cleanup and whatnot).

Slice your tomatoes in half, and remove the seeds. This can most easily be accomplished through gentle squeezing, which is oddly satisfying. Chop your onion and red pepper, and divide each into four even piles. Have your garlic chopped if it doesn't already come that way.

Assemble your pouches. On each sheet of parchment, place 1/4 cup of rice in a rectangular pile, then place a piece of frozen fish over top. Trust me on this, okay? Next, add one of the onion/pepper piles over top of that. Then add your chopped garlic, about two cloves' worth. Squeeze half a lemon over top and sprinkle with Italian seasoning, salt, and pepper.

Now seal your pouches. Fold the parchment up like a hot dog going longways with the fish. Then, crease the edges together and fold downward. Now staple them shut. Yes, with actual staples. Twist one of the ends up to close it, angling the fold upwards. Have the other end ready to twist, but do not seal it yet.

Pour about six ounces (about half a can) of your veggie broth into each pouch, then twist the end shut. Place each pouch side-by-side on your sheet pan, and set the whole thing in the oven. Bake for 15 minutes, then gently rotate the pouches by moving the outer two in and the middle two out. Bake for 15 to 20 minutes longer. When the timer beeps at you, pull the pouches out of the oven, and allow them to sit another 15 minutes so that the rice can finish absorbing all the liquids. When that's done, tear into them and gobble them up!


I had much better results this go around. The fish was wonderfully cooked, the rice was a perfect al dente, and the veggies were all tender without being mushy. The seasonings were more spot on then last time, but I think I still need to work on them just a bit. But to really guage the success, we need to compare to our acronym:

Fast: Much better than last time, but still over my goal of 1 hour from start to finish. It was more like 1 hour 15 minutes, but a goal is a goal, right? To be fair, I think this is the only shortcoming here.

Easy: Yep. Just chop and assemble. Even the clean up is a breeze, since the cooking vessels get tossed in the garbage.

Affordable: At around $12 to $15, this is exactly where I want the budget to land, so I call this a win, especially compared to last time.

Super Tasty: The flavors were much better this time, although I still think there's some room for improvement. But that having been said, I am still quite pleased with the results.

So there you have it. A great success, but one that still leaves me with some room to tinker around. After all, cooking is, at its heart, as much an art as a science, and finding that balance takes a great deal of work. As I said though, I am pleased with how this turned out, and I'm looking forward to tinkering with it some more in the future. I love the whole pouch cooking concept, and I am excited to see where I can take it next.

Anyway, thanks for reading. Please post any thoughts you have on the subject at your leisure. Go forth and eat well!

Monday, February 17, 2014

Happy Holidays: Deep-Fried Strawberry-Filled Brownies

Hi all,

I'm not a huge fan of Valentine's Day. I never have been, not since I was a kid. Back then, it was all about paper valentines and candy in class. And I liked that, because there was a lot less pressure, and plus, it was about the food. I say, why not make it be just about the food once more? So I came up with something tasty.


That's right: I deep-fried a brownie. It's like the State Fair without all the walking around. You may ask why? You may say I'm mad. I say what better way to pay tribute to a celebration of the heart than by clogging your arteries a little. So there!

The cool thing about this is that it's relatively simple, although I did hit a few bumps along the way. But they were generally agreed to be delicious, so I'll let you the reader be the judge.

THE INGREDIENTS!!!
1 box deluxe brownie mix
All the fixings needed to make said brownies (oil, water, eggs)
8 small strawberries, stems removed and cut in half longways
1 good beer (I used Young's Double-Chocolate Stout. Because why not?)
2 cups flour
3 tsp baking powder
1 tsp salt

THE METHOD!!!
Mix a batch of brownie batter. I followed the suggestion on the box for "thicker brownies" which meant less water and an extra egg, but follow your heart here. Submerge the strawberry halves in the brownie batter. I went with a simple four-by-four grid. You can try to mess with the size but I don't recommend it. Bake the brownies as the box commands you. After the brownies have completely cooled, cut into 16 individual pieces.


Combine the flour, salt and baking powder together in a mixing bowl, then slowly incorporate the beer. Whisk together, then let the batter sit for about 10 minutes so all the flour can hydrate. Coat each brownie in batter, then deep fry at 350 for two to three minutes or until done. Drain on paper towels, then dust with powdered sugar. Consume.

Simple, right? Ok, I'll admit, the beer batter was way too thick for practical use. I had to try a variety of methods for coating the brownies, because dunking them just wasn't as effective as I'd like it to be. The tricky little buggers didn't want to hold together too well. I ended up placing each brownie on top of the batter, then spooning some over top to coat. Still, it was tricky. In the end though, I call them a success, because they tasted wonderful (think chocolate funnel cake) and were more or less bad for you, which makes them even better.

Anyway, let me know what you think!

Thanks for reading. Go forth an eat well!